约定式提交规范
# Conventional Commits
约定式提交规范,一种用于给提交信息增加人机可读含义的规范。
# 背景
一般工程提交信息写的过于随意没有一定的规则,这会导致两个问题:
- 追溯历史提交记录时不方便,无法准确定位某次提交的具体作用,比较费时间,尤其在多人协作项目中
- 无法自动生成 CHANGELOG
因此有了Conventional Commits(约定式提交规范),遵守该规范会使提交信息更可读,且方便自动生成 CHANGELOG,并可自动决定语义化的版本变更。
具体规范参考:Conventional Commits (opens new window)
这里引用官方规范文档中文案:
# 为什么使用约定式提交
- 自动化生成 CHANGELOG。
- 基于提交的类型,自动决定语义化的版本变更。
- 向同事、公众与其他利益关系者传达变化的性质。
- 触发构建和部署流程。
- 让人们探索一个更加结构化的提交历史,以便降低对你的项目做出贡献的难度。
# 整体认知
为了工程中落地使用Conventional Commits,牵涉到不同层面的库,东西比较多,一开始容易一头雾水,先看一个整体架构图,有个直观的印象:
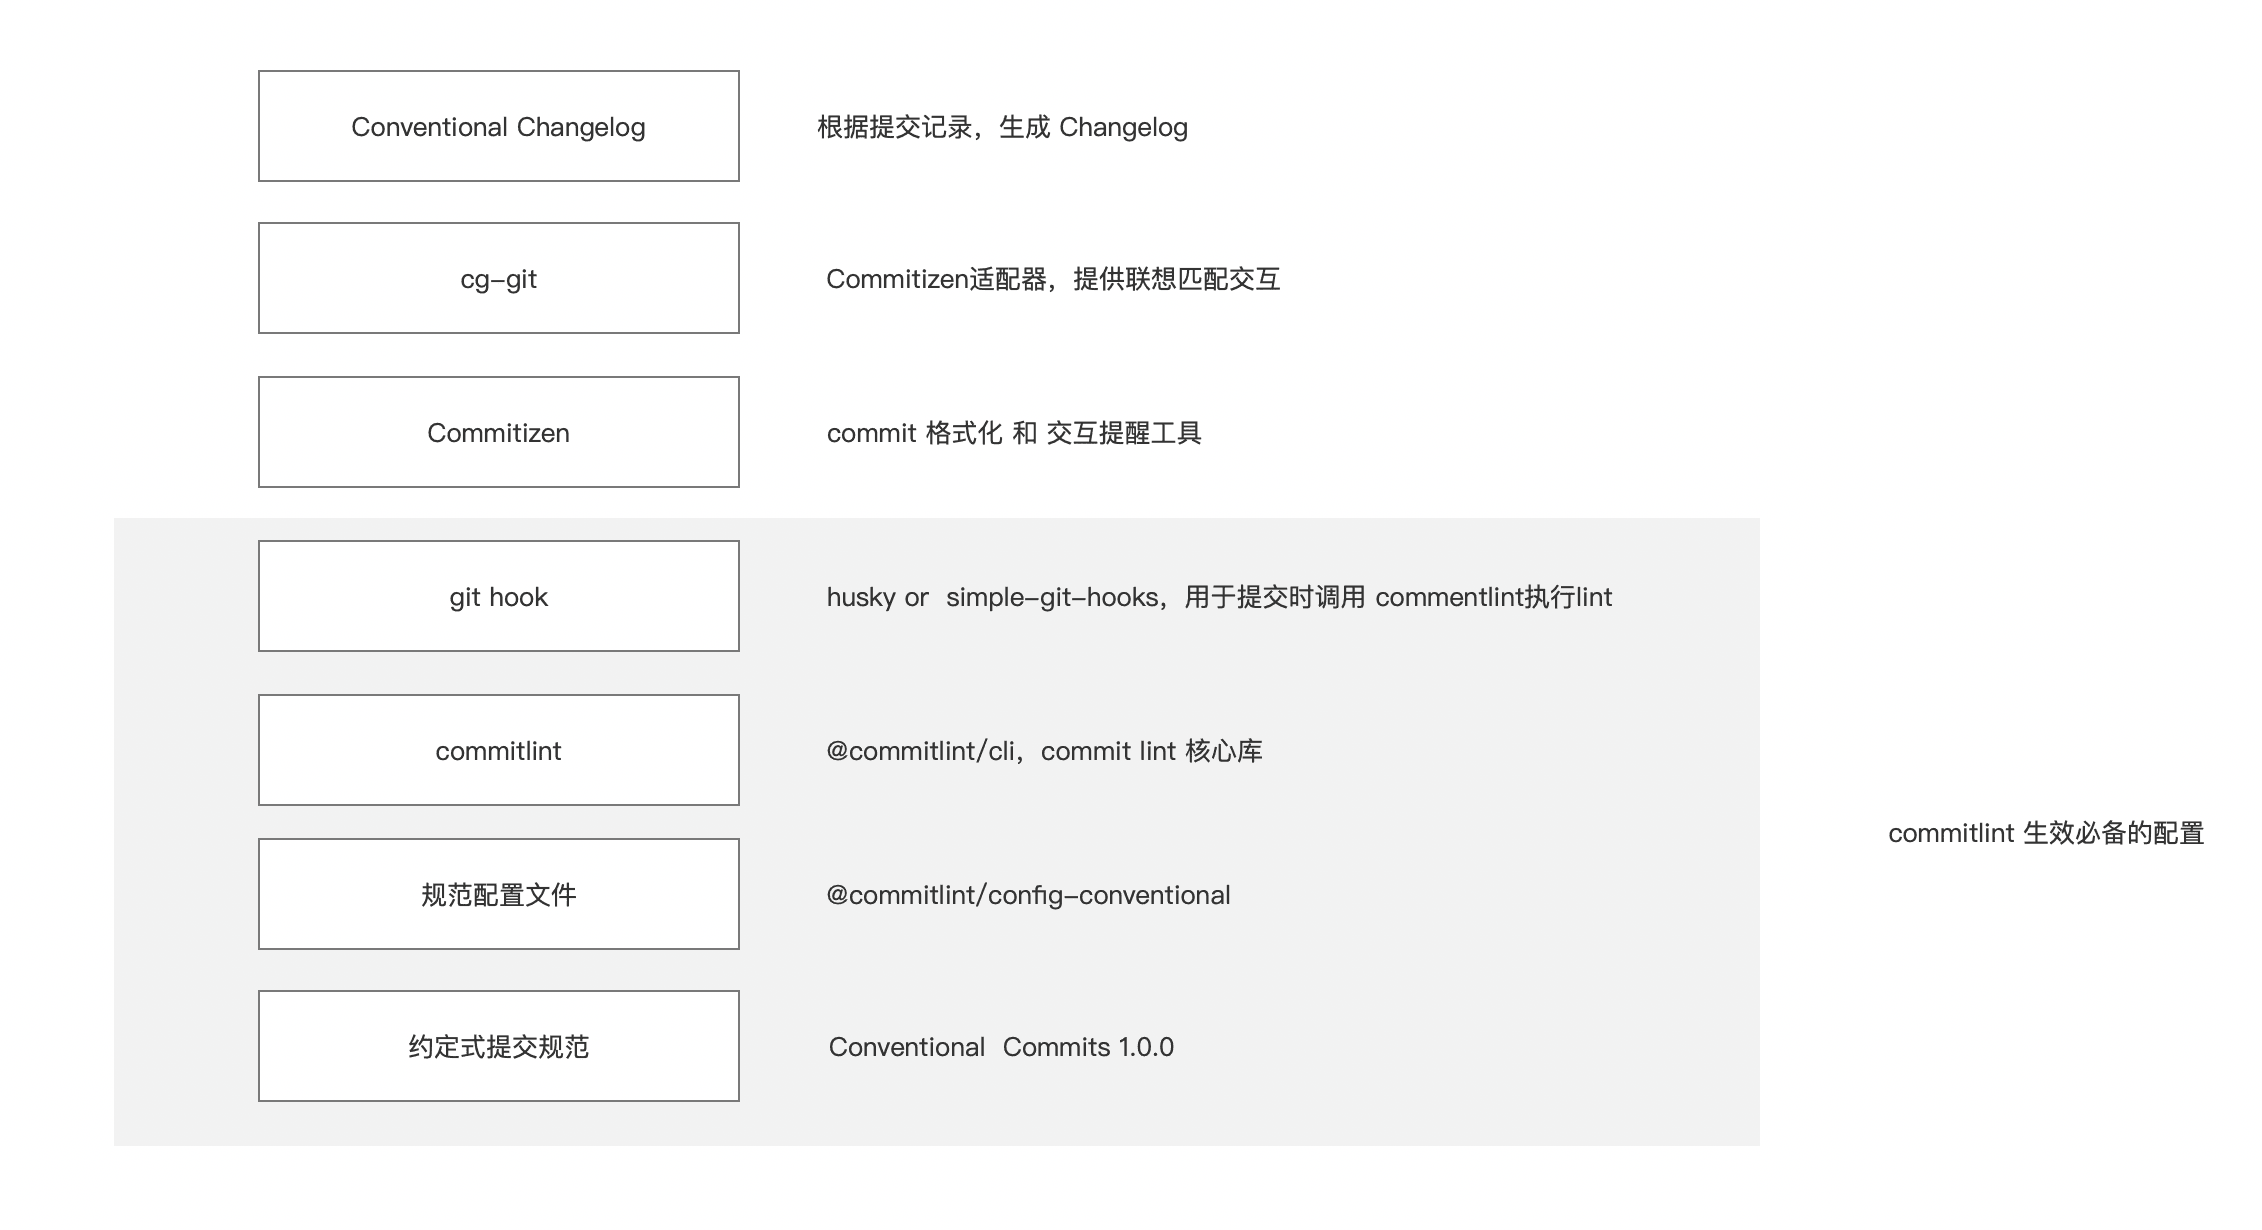
一层层解释下:
- Conventional Commits (opens new window),规范文档,该文档为官方文档,定义了约定式提交规范的基本内容
- commitlint (opens new window),@commitlint/cli,lint 工具,使用该工具对提交信息进行 lint
- @commitlint/config-conventional (opens new window),规范配置文件,定义工程的约定式提交规范,commitlint 需要使用配置文件的定义对提交信息进行检查,规范配置文件有很多,一般使用该配置文件,可以基于该配置文件自定义
- Git hook,使用 husky (opens new window) or simple-git-hooks (opens new window),Git 钩子工具,用于在提交时调用 commitlint 命令对提交进行 lint,simple-git-hooks 比较轻量,如果自定义东西比较多时考虑使用 husky
- 交互式提示工具,Commitizen (opens new window) or cg-git (opens new window),可以通过交互式命令生成遵守规范的提交
- CHANAGELOG 工具,conventional-changelog-cli (opens new window) or release-please (opens new window),在遵守约定式提交规范的基础上,自动根据 log 生成 CHANGELOG
其中 commitlint、规范配置文件、git hook 三者是必须的,工程中配置这三个后,每次提交即会自动检查 commit message 是否符合规范
# 规范文档
约定式提交规范官方规范文档 Conventional Commits (opens new window),文档详细介绍了约定式提交规范的基本内容。
规范提交的基本格式为:
<type>[optional scope]: <description>

[optional body]

[optional footer(s)]


// ---------------------
// 译文
<类型>[可选 范围]: <描述>

[可选 正文]

[可选 脚注]
核心点:
提交说明包含了下面的结构化元素,以向类库使用者表明其意图:
- fix: 类型 为
fix的提交表示在代码库中修复了一个 bug(这和语义化版本中的PATCH(opens new window) 相对应)。- feat: 类型 为
feat的提交表示在代码库中新增了一个功能(这和语义化版本中的MINOR(opens new window) 相对应)。- BREAKING CHANGE: 在脚注中包含
BREAKING CHANGE:或 <类型>(范围) 后面有一个!的提交,表示引入了破坏性 API 变更(这和语义化版本中的MAJOR(opens new window) 相对应)。 破坏性变更可以是任意 类型 提交的一部分。- 除
fix:和feat:之外,也可以使用其它提交 类型 ,例如 @commitlint/config-conventional (opens new window)(基于 Angular 约定 (opens new window))中推荐的build:、chore:、ci:、docs:、style:、refactor:、perf:、test:,等等。- 脚注中除了
BREAKING CHANGE: <description>,其它条目应该采用类似 git trailer format (opens new window) 这样的惯例。其它提交类型在约定式提交规范中并没有强制限制,并且在语义化版本中没有隐式影响(除非它们包含 BREAKING CHANGE)。 可以为提交类型添加一个围在圆括号内的范围,以为其提供额外的上下文信息。例如
feat(parser): adds ability to parse arrays.。
示例:
// 普通功能提交
feat: complete a feature

//包含 BREAKING CHANGE
feat: allow provided config object to extend other configs

BREAKING CHANGE: `extends` key in config file is now used for extending other config files

// 或者直接使用 ! 符号
feat!: send an email to the customer when a product is shipped

// 包含范围的提交说明
feat(lang): add polish language

// 包含多行正文和多行脚注的提交说明
fix: prevent racing of requests

Introduce a request id and a reference to latest request. Dismiss
incoming responses other than from latest request.

Remove timeouts which were used to mitigate the racing issue but are
obsolete now.

Reviewed-by: Z
Refs: #123
规范文档约定了轻量级的规范,具体落地到工程需要规范配置文件。
注:一般来说脚注用来放 BREAKING CHANGE、issue 关闭、作者、参考等
# 规范配置文件
一般工程常用的是@commitlint/config-conventional (opens new window),该规范基于 Angular 约定 (opens new window),规定 type 为以下类型
feat增加新功能fix修复问题/BUGperf优化/性能提升style代码风格相关无影响运行结果的 (空格、格式化、逗号分号, 等等)refactor代码重构(既不修复 bug,也不增加功能)docs文档/注释test测试相关revert撤销修改chore依赖更新/脚手架配置修改等(不改变 src 或测试文件,仅仅更新构建任务、包管理等)build构造工具的或者外部依赖的改动,例如 webpack,npmci与 CI(持续集成服务)有关的改动
详细配置见:index.js (opens new window)
基本以上配置已经覆盖了绝大多数工程需求,如果需要加入自定义内容,可以基于该配置文件,添加自定义修改。
//工程添加 @commitlint/config-conventional
pnpm add -D @commitlint/config-conventional
# Commitlint
commitlint (opens new window)是核心,使用该 lint 工具基于规范配置文件对提交信息进行 lint 检查。官方文档写了很多东西,其实核心是使用 commitlint 进行 lint 检查,使用是很简单的,前期可以抛开文档中其他部分,先用起来,后面可以慢看看文档,文档基本覆盖了约定式提交规范的全部内容,工具链也比较多。
// 添加 @commitlint/cli
pnpm add -D @commitlint/cli

// 指定配置文件 package.json 中增加以下内容,这会直接使用 @commitlint/config-conventional 配置,当需要自定义时,可建文件
{
 "commitlint": {
    "extends": [
      "@commitlint/config-conventional"
    ]
  }
}
配置文件可以是以下文件:
.commitlintrc.commitlintrc.json.commitlintrc.yaml.commitlintrc.yml.commitlintrc.js.commitlintrc.cjs.commitlintrc.ts.commitlintrc.ctscommitlint.config.jscommitlint.config.cjscommitlint.config.tscommitlint.config.ctscommitlintfield inpackage.json
简单使用@commitlint/config-conventional时,直接在 package.json 中配置即可,如果需要复杂自定义,可在工程中建一个对应的配置文件进行自定义,自定义规则参考:Configuration (opens new window)、Rules (opens new window)
下一步,需要在执行 git commit 命令时自动执行 lint 检查
# Git hooks
commitlint 的执行期望是在提交的时候,即执行 git commit 命令时候执行检查,这时候需要 git hook。
目前常用的 Git hooks 工具有 husky (opens new window) 和 simple-git-hooks (opens new window),simple-git-hooks更轻量上手更简单,husky配置更多。即无特殊自定义配置,直接用simple-git-hooks,自定义配置较多的情况下使用husky。
# husky
husky的集成也比较简单,husky会在工程root目录下创建.husky目录,里面会存放对应钩子文件执行对应命令
资料:
集成方法:
// 1. 自动安装husky
pnpm dlx husky-init && pnpm install

// 2. 给husky增加hook命令,例如增加commitlint
pnpx husky add .husky/commit-msg 'npx --no -- commitlint --edit "$1"'


// 执行完第一条命令,工程会自动安装husky,并创建 .husky 文件,并在package.json里增加prepage脚本命令
{
  "scripts": {
    "prepare": "husky install"
  },
}


// 工程目录如下,husky会在工程root目录下创建 .husky 文件,相关钩子命令会在里面对应的文件里,如 commit-msg 文件
.
├── .git
│   └── sourcetreeconfig
├── .gitignore
├── .husky
│   ├── _
│   ├── commit-msg		# 对应钩子文件,里面写入对应需要执行的钩子命令
│   └── pre-commit		# 对应钩子文件

// commit-msg文件内容
#!/usr/bin/env sh
. "$(dirname -- "$0")/_/husky.sh"

npx --no -- commitlint --edit "$1"
# simple-git-hooks
commilint 官方文旦使用的 husky,我们这里使用 simple-git-hooks 来配置 commitlint
// 1.add simple-git-hooks
pnpm add -D simple-git-hooks

// 2. package.json添加以下内容
{
  "simple-git-hooks": {
  	"commit-msg": "pnpm commitlint"
  }
}

// 3. package.json中配置 postinstall 钩子,该钩子每次执行安装后使 simple-git-hooks 生效(其实simple-git-hooks命令执行一次即可)
{
  "scripts": {
  	"postinstall": "pnpm simple-git-hooks"
  }
}

// 注,simple-git-hooks官方的命令如下,如果是从husky迁移的需要注意:
# [Optional] These 2 steps can be skipped for non-husky users
git config core.hooksPath .git/hooks/
rm -rf .git/hooks

# Update ./git/hooks
npx simple-git-hooks
工程添加该配置后,执行 pnpm i,然后尝试修改提交,commilint 就会按照 @commitlint/config-conventional 的配置进行规范提交检查了。
# 关于 commitlint 提交命令
- 官方文档集成 husky 时的命令是:
commitlint --edit ${1} - 集成 simple-git-hooks 的命令是:
commitlint
对这个命令很费解,到底需要不需要 --edit 参数?
commlint 对--edit 参数的解释是:
-e, --edit read last commit message from the specified file or fallbacks to ./.git/COMMIT_EDITMSG [string]
看完仍是很困惑,最终找到了一篇文章 (opens new window)解释:
执行
commit命令后,git会将commit消息存放于一个临时文件中;然后触发pre-commit钩子,pre-commit钩子成功之后就会触发commit-msg,commit-msg钩子成功后则会将临时文件中的文本作为此次commit消息进行存储;并且
commit-msg钩子会对脚本传一个参数,这个参数就是存放commit消息的临时文件的路径;所以得到这个参数,就可以读取该文件的内容,也就能得到当前commit消息了;同理,在commit-msg钩子中覆盖这个文件就能对此次commit消息进行修改了;It takes a single parameter, the name of the file that holds the proposed commit log message.[1] (opens new window)
不过,由于在
husky中的指定的commit-msg钩子命令并不是 git 直接执行的,因此只能通过husky间接暴露的变量$HUSKY_GIT_PARAMS来获取临时文件的地址,如:# $HUSKY_GIT_PARAMS变量就是commit-msg钩子传递的文件路径参数 node ./hooks/commit-msg $HUSKY_GIT_PARAMSGit hooks can get parameters via command-line arguments and stdin. Husky makes them accessible via HUSKY_GIT_PARAMS and HUSKY_GIT_STDIN environment variables.[2] (opens new window)
其中$1 就是HUSKY_GIT_PARAMS (opens new window),就是 commit-msg 钩子传递的文件路径参数
HUSKY_GIT_PARAMSis removed. Instead Git parameters should be used directly in scripts (e.g.$1).
综合起来看,$1 就是 husky 暴露的 commit-msg 钩子传递的文件路径参数。即 `commitlint --edit ${1}``,就是对从$1 获取到的提交信息进行 lint。
但是 simple-git-hooks 似乎不需要--edit 参数,具体也查到资料,可能是因为 simple-git-hooks 与 husky 实现原理不一样。
# vue3 工程中规范提交检查的实现
- Vuejs (opens new window) 工程中 git hooks 工具使用的 simple-git-hooks
- 规范见Git Commit Message Convention (opens new window)(This is adapted from Angular's commit convention (opens new window).)
- lint 工具没有采用 commitlint 而是自己写了正则校验
推测 Vue 工程因为都是高手,而且 lint 的核心就是正则校验,所以自己写了一个脚本保持代码轻量。
// package.json
  "simple-git-hooks": {
    "pre-commit": "pnpm lint-staged && pnpm check",
    "commit-msg": "node scripts/verifyCommit.js"
  },

// verifyCommit.js 文件通过正则对type进行了校验

// @ts-check
import chalk from 'chalk'
import { readFileSync } from 'fs'
import path from 'path'

const msgPath = path.resolve('.git/COMMIT_EDITMSG')
const msg = readFileSync(msgPath, 'utf-8').trim()

const commitRE =
  /^(revert: )?(feat|fix|docs|dx|style|refactor|perf|test|workflow|build|ci|chore|types|wip|release)(\(.+\))?: .{1,50}/

if (!commitRE.test(msg)) {
  console.log()
  console.error(
    `  ${chalk.bgRed.white(' ERROR ')} ${chalk.red(
      `invalid commit message format.`
    )}\n\n` +
      chalk.red(
        `  Proper commit message format is required for automated changelog generation. Examples:\n\n`
      ) +
      `    ${chalk.green(`feat(compiler): add 'comments' option`)}\n` +
      `    ${chalk.green(
        `fix(v-model): handle events on blur (close #28)`
      )}\n\n` +
      chalk.red(`  See .github/commit-convention.md for more details.\n`)
  )
  process.exit(1)
}
# 工程落地完整实践
// 1. 添加三个库
pnpm add -D @commitlint/config-conventional
pnpm add -D @commitlint/cli
pnpm add -D simple-git-hooks

// 2. 配置 package.json文件
{
 "scripts": {
  	"postinstall": "pnpm simple-git-hooks"
  },
  "simple-git-hooks": {
  	"commit-msg": "pnpm commitlint"
  },
  "commitlint": {
    "extends": [
      "@commitlint/config-conventional"
    ]
  }
}

// 3 当没有在package.js 中没有配置commitlint,则 工程中添加 .commitlintrc.js 文件,添加以下内容(推荐使用这种方式,避免package.js臃肿,且工程结构清晰)
module.exports = {
  extends: ['@commitlint/config-conventional']
}
经过以上配置,工程在执行代码提交时,即可实现自动检查。
# 交互提示工具
# Commitizen
Commitizen (opens new window)是一个交互性帮助规范 commit message 的工具,按照工具提示一步步即可生成符合指定规范的提交信息。
注:commitizen 只是一个交互式生成提交信息的工具,本身并不对提交信息进行 lint。
即交互式的、选项式的一步步生成提交信息,节省了重复输入的时间。
详细安装可以参考Commitizen (opens new window)说明,这里简单介绍下:
//1. 全局安装 commitizen,如果将cz 或 git cz命令加入提交前命令,就需要本地安装,但是一般建议对commitlint加入提交前检查,而commitiizen个人全局安装
npm install -g commitizen

//2. 使工程Commitizen friendly,注这一步使用的是cz-conventional-changelog规范
# npm
commitizen init cz-conventional-changelog--save-dev --save-exact
# yarn
commitizen init cz-conventional-changelog --yarn --dev --exact
# pnpm
commitizen init cz-conventional-changelog --pnpm --save-dev --save-exact

// 配置完后工程package.json会多出
"config": {
  "commitizen": {
    "path": "cz-conventional-changelog"
  }
}

// 然后使用 cz 、 git cz 、git-cz 代替 git commit 命令进行提交,即可出现交互式提示
cz
git cz
git-cz
上面示例中,使用的是 cz-conventional-changelog 规范,采用的是 Angular 规范,详见conventional-commit-types (opens new window)。
在 commitizen 中,cz-conventional-changelog 是一个适配器的概念,如果需要自定义规范,需要采用其他适配器,比如:cz-customizable (opens new window),具体配置可参考其说明,增加自定义的规范配置。
整体上来说 commitizen 简化了提交步骤,帮助我们生成规范提交信息,但是还是不太好用,而且选项式的交互要一个个选,不支持联想,自定义配置上也比较繁琐。不推荐使用,下面重点介绍下cz-git (opens new window),
# cz-git 和 czg
# cg-git
cg-git (opens new window)一款轻量级,交互友好,高度自定义,支持联想,遵循标准 Angular commit 规范的 Commitizen Adapter。
注意:
- cg-git 是 Commitizen 的适配器,其本身依赖 Commitizen
- cg-git 的优势是支持联想、规范配置简单灵活

可以先读下作者的这两篇文章:
具体配置方式见:快速开始 (opens new window)
// 1. 全局或项目添加 commitizen
npm install -g commitizen
or
npm install -D commitizen

// 2. 安装 cz-git
npm install -D cz-git

// 3. 修改 package.json 添加 config 指定使用的适配器
{
  "scripts": {

  },
  "config": {
    "commitizen": {
      "path": "node_modules/cz-git"
    }
  }
}

// 4. 规范配置(下面介绍)
可以使用 cg-git 自带的默认配置 (opens new window),也可以与 commitlint 结合使用,建立 commlint 支持的配置文件(例如**.commitlintrc.js**),在文件内直接自定义,文件配置在配置模板 (opens new window)中介绍的比较清楚。即
cg-git 自带了默认配置 (opens new window)(在 Javascript 模板中),另外还有:中英文对照模板 (opens new window)、纯汉化模板(不推荐) (opens new window)、Emoji 模板 (opens new window)、JSON 模板 (opens new window)
// .commitlintrc.js
/** @type {import('cz-git').UserConfig} */
module.exports = {
  rules: {
    // @see: https://commitlint.js.org/#/reference-rules
  },
  prompt: {
    alias: { fd: "docs: fix typos" },
    messages: {
      type: "Select the type of change that you're committing:",
      scope: "Denote the SCOPE of this change (optional):",
      customScope: "Denote the SCOPE of this change:",
      subject:
        "Write a SHORT, IMPERATIVE tense description of the change:\n",
      body: 'Provide a LONGER description of the change (optional). Use "|" to break new line:\n',
      breaking:
        'List any BREAKING CHANGES (optional). Use "|" to break new line:\n',
      footerPrefixesSelect:
        "Select the ISSUES type of changeList by this change (optional):",
      customFooterPrefix: "Input ISSUES prefix:",
      footer: "List any ISSUES by this change. E.g.: #31, #34:\n",
      generatingByAI: "Generating your AI commit subject...",
      generatedSelectByAI: "Select suitable subject by AI generated:",
      confirmCommit:
        "Are you sure you want to proceed with the commit above?",
    },
    types: [
      {
        value: "feat",
        name: "feat:     A new feature",
        emoji: ":sparkles:",
      },
      { value: "fix", name: "fix:      A bug fix", emoji: ":bug:" },
      {
        value: "docs",
        name: "docs:     Documentation only changes",
        emoji: ":memo:",
      },
      {
        value: "style",
        name: "style:    Changes that do not affect the meaning of the code",
        emoji: ":lipstick:",
      },
      {
        value: "refactor",
        name: "refactor: A code change that neither fixes a bug nor adds a feature",
        emoji: ":recycle:",
      },
      {
        value: "perf",
        name: "perf:     A code change that improves performance",
        emoji: ":zap:",
      },
      {
        value: "test",
        name: "test:     Adding missing tests or correcting existing tests",
        emoji: ":white_check_mark:",
      },
      {
        value: "build",
        name: "build:    Changes that affect the build system or external dependencies",
        emoji: ":package:",
      },
      {
        value: "ci",
        name: "ci:       Changes to our CI configuration files and scripts",
        emoji: ":ferris_wheel:",
      },
      {
        value: "chore",
        name: "chore:    Other changes that don't modify src or test files",
        emoji: ":hammer:",
      },
      {
        value: "revert",
        name: "revert:   Reverts a previous commit",
        emoji: ":rewind:",
      },
    ],
    useEmoji: false,
    emojiAlign: "center",
    useAI: false,
    aiNumber: 1,
    themeColorCode: "",
    scopes: [],
    allowCustomScopes: true,
    allowEmptyScopes: true,
    customScopesAlign: "bottom",
    customScopesAlias: "custom",
    emptyScopesAlias: "empty",
    upperCaseSubject: false,
    markBreakingChangeMode: false,
    allowBreakingChanges: ["feat", "fix"],
    breaklineNumber: 100,
    breaklineChar: "|",
    skipQuestions: [],
    issuePrefixes: [
      { value: "closed", name: "closed:   ISSUES has been processed" },
    ],
    customIssuePrefixAlign: "top",
    emptyIssuePrefixAlias: "skip",
    customIssuePrefixAlias: "custom",
    allowCustomIssuePrefix: true,
    allowEmptyIssuePrefix: true,
    confirmColorize: true,
    maxHeaderLength: Infinity,
    maxSubjectLength: Infinity,
    minSubjectLength: 0,
    scopeOverrides: undefined,
    defaultBody: "",
    defaultIssues: "",
    defaultScope: "",
    defaultSubject: "",
  },
};
可与 commitlint 结合起来,直接在 commitlint 支持的配置文件或 cz.config.js 、cz.config.cjs 文件修改,推荐与 commintlint 配置结合
// 示例
// .commitlintrc.js 中使用 @commitlint/config-conventional(需先添加 @commitlint/config-conventional )
module.exports = {
  extends: ['@commitlint/config-conventional']
}

// 自定义配置,只支持 feat、fix
module.exports = {
  prompt: {
    types: [
      { value: 'feat', name: 'feat:     A new feature', emoji: ':sparkles:' },
      { value: 'fix', name: 'fix:      A bug fix', emoji: ':bug:' }
    ]
  }
}
其他配置的详细说明可参考其说明。
整体来说,cg-git 是一个很好的 commitizen 适配器,联想功能和高度灵活的配置使其非常好用。
# czg
czg = commitizen + cz-git,更轻量。
注意:czg 是 commitize 的替代品,不是适配器,czg 不依赖 commitize。
cz-git 是 commitizen 的适配器。而 czg 具有 cz-git 相同的行为和配置加载。如果你的团队中有人使用 Commitizen CLI,两者可以混用,毕竟两者都非常小并且无需下载其他依赖项。
- 如果你使用
cz或git cz命令将会启动commitizenCLI +cz-git适配器- 如果你使用
czg或git czg命令只会启动czgCLI
相比于 cz-git 依赖 commitizen,czg 会更轻量。
//1. 全局安装,全局安装后直接可使用 czg命令
npm install -g czg

// or 项目安装
npm install -D czg

// 在 package.json 中添加启动脚本 运行命令进行尝试 npm czg
{
  "scripts": {
    "czg": "czg"
  }
}

// 规范配置部分与cg-git相同

// 提交时使用 czg 或 npm czg 即可打开czg进行交互式提交
RECOMMEND:
- cgz 更轻量,推荐直接使用 cgz
- 如果自定配置较多的提交规范,建议工程集成 cgz;如果基本与默认配置相同,建议本地全局安装 cgz
# 基于czg的最佳工程实践
// 1. Add commitlint
pnpm add -D @commitlint/cli

// 2. Add husky
pnpm dlx husky-init && pnpm install
pnpx husky add .husky/commit-msg 'npx --no -- commitlint --edit "$1"'

// 3. Add czg
pnpm add -D czg
// package.json配置czg脚本
{
  "scripts": {
    "cz": "czg"
  }
}


//4. 工程增加 .commitlintrc.js 文件,为commitlint和czg配置文件,文件内容如下(采用 cz-git 中英文配置文件)
// .commitlintrc.js
/** @type {import('cz-git').UserConfig} */
module.exports = {
  rules: {
    'body-leading-blank': [2, 'always'],
    'footer-leading-blank': [1, 'always'],
    'header-max-length': [2, 'always', 108],
    'subject-empty': [2, 'never'],
    'type-empty': [2, 'never'],
    'subject-case': [0],
    'type-enum': [
      2,
      'always',
      ['feat', 'fix', 'docs', 'style', 'refactor', 'perf', 'test', 'build', 'ci', 'revert', 'chore']
    ]
  },
  prompt: {
    alias: { fd: 'docs: fix typos' },
    messages: {
      type: '选择你要提交的类型 :',
      scope: '选择一个提交范围(可选):',
      customScope: '请输入自定义的提交范围 :',
      subject: '填写简短精炼的变更描述 :\n',
      body: '填写更加详细的变更描述(可选)。使用 "|" 换行 :\n',
      breaking: '列举非兼容性重大的变更(可选)。使用 "|" 换行 :\n',
      footerPrefixesSelect: '选择关联issue前缀(可选):',
      customFooterPrefix: '输入自定义issue前缀 :',
      footer: '列举关联issue (可选) 例如: #31, #I3244 :\n',
      confirmCommit: '是否提交或修改commit ?'
    },
    types: [
      { value: 'feat', name: 'feat:     新增功能 | A new feature' },
      { value: 'fix', name: 'fix:      修复缺陷 | A bug fix' },
      { value: 'docs', name: 'docs:     文档更新 | Documentation only changes' },
      { value: 'style', name: 'style:    代码格式 | Changes that do not affect the meaning of the code' },
      { value: 'refactor', name: 'refactor: 代码重构 | A code change that neither fixes a bug nor adds a feature' },
      { value: 'perf', name: 'perf:     性能提升 | A code change that improves performance' },
      { value: 'test', name: 'test:     测试相关 | Adding missing tests or correcting existing tests' },
      { value: 'build', name: 'build:    构建相关 | Changes that affect the build system or external dependencies' },
      { value: 'ci', name: 'ci:       持续集成 | Changes to our CI configuration files and scripts' },
      { value: 'revert', name: 'revert:   回退代码 | Revert to a commit' },
      { value: 'chore', name: 'chore:    其他修改 | Other changes that do not modify src or test files' },
    ],
    useEmoji: false,
    emojiAlign: 'center',
    useAI: false,
    aiNumber: 1,
    themeColorCode: '',
    scopes: [],
    allowCustomScopes: true,
    allowEmptyScopes: true,
    customScopesAlign: 'bottom',
    customScopesAlias: 'custom',
    emptyScopesAlias: 'empty',
    upperCaseSubject: false,
    markBreakingChangeMode: false,
    allowBreakingChanges: ['feat', 'fix'],
    breaklineNumber: 100,
    breaklineChar: '|',
    skipQuestions: [],
    issuePrefixes: [
      // 如果使用 gitee 作为开发管理
      { value: 'link', name: 'link:     链接 ISSUES 进行中' },
      { value: 'closed', name: 'closed:   标记 ISSUES 已完成' }
    ],
    customIssuePrefixAlign: 'top',
    emptyIssuePrefixAlias: 'skip',
    customIssuePrefixAlias: 'custom',
    allowCustomIssuePrefix: true,
    allowEmptyIssuePrefix: true,
    confirmColorize: true,
    maxHeaderLength: Infinity,
    maxSubjectLength: Infinity,
    minSubjectLength: 0,
    scopeOverrides: undefined,
    defaultBody: '',
    defaultIssues: '',
    defaultScope: '',
    defaultSubject: ''
  }
}


// 5.提交时执行 pnpm cz即可
git add .
pnpm cz
资料:
# CHANGELOG
根据规范提交信息自动生成版本信息,相关工具:
- Standard Version (opens new window),使用较多,但是作者本身已经不维护了,作者推荐使用 release-please
- conventional-changelog-cli (opens new window),Generate a changelog from git metadata
- release-please (opens new window),与 Github 结合的比较好
根据 npmtrends 数据,使用量 standard-version > conventional-changelog-cli > release-please
以 standarr-version 为例:
// 1. 全局或项目安装 standard-version
npm install -g standard-version
or
pnpm add -D standard-version

// 2. 项目安装则需要配置packagejson
{
  "scripts": {
    "release": "standard-version"
  }
}

// 3. 则可使用 pnpm release 命令,会在项目中自动生成 CHANGELOG.md 文件
CHANGELOG.md 文件示例:
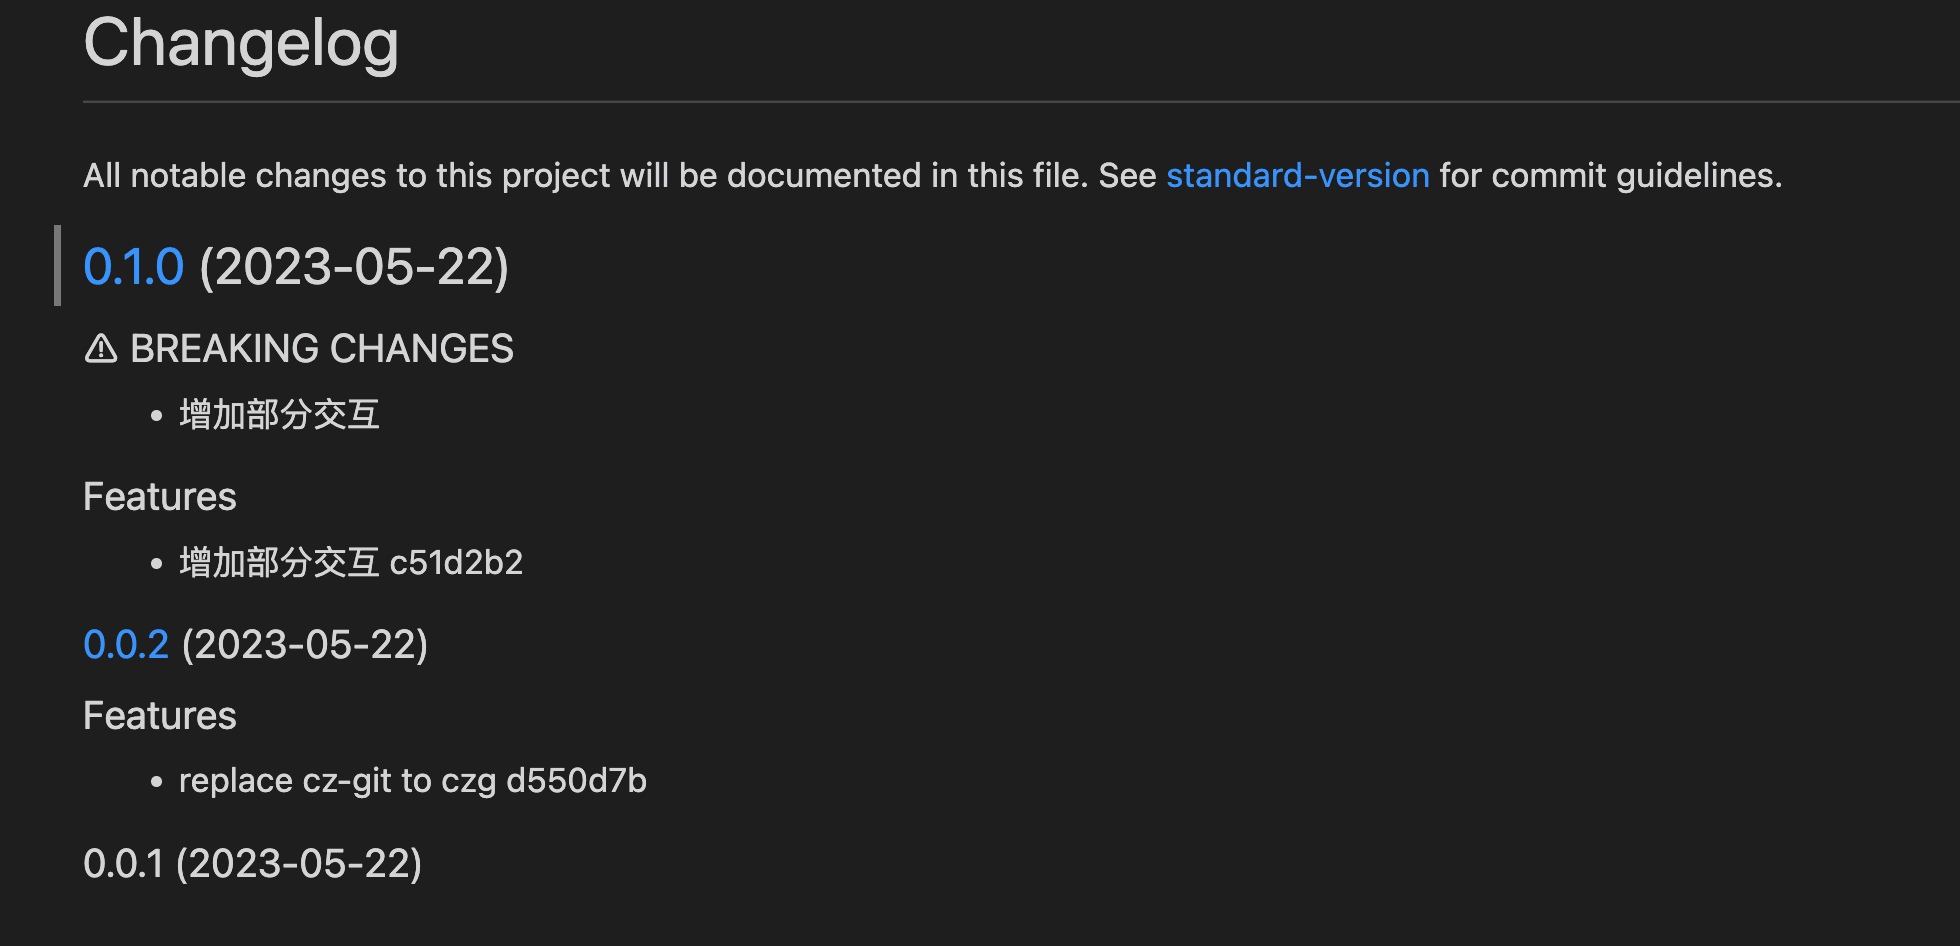
即pnpm release 命令,会完成四件事:
- 提取 feat、feat!、fix、BREAKCHANGE 提交信息生成版本记录和版本变更,生成 CHANGELOG.md 文件
- 修改 package.json 文件版本,并
- 自动生成一个
chore(release): 0.1.0的提交(提交内容包含 CHANGE.md 文件和 package.josn 文件) - 添加 git 对应版本 TAG
# 附录
- 约定式提交规范 Conventional Commits (opens new window)
- Angular 团队规范 (opens new window)
- Vue Git Commit Message Convention (opens new window)
- commitlint (opens new window)
- husky (opens new window)
- simple-git-hooks (opens new window)
- Commitizen (opens new window)
- cg-git (opens new window)
- Standard Version (opens new window)